Abstract
Advanced Image Processing with OpenCV is a Python application that demonstrates a variety of image processing techniques using the OpenCV library. The project covers filtering, edge detection, feature extraction, and image transformations, providing a modular and extensible framework for computer vision tasks.
Prerequisites
- Python 3.8 or above
- A code editor or IDE
- Basic understanding of image processing
- Required libraries:
opencv-python,numpy,matplotlib
Before you Start
Install Python and the required libraries:
pip install opencv-python numpy matplotlibGetting Started
Create a Project
- Create a folder named
advanced-image-processing-opencv. - Open the folder in your code editor or IDE.
- Create a file named
advanced_image_processing_with_opencv.py. - Copy the code below into your file.
Write the Code
Advanced Image Processing with OpenCV
Source"""
Advanced Image Processing with OpenCV
This project demonstrates advanced image processing techniques using OpenCV, including edge detection, filtering, morphological operations, color transformations, and saving processed images. Includes CLI for selecting processing type.
"""
import cv2
import numpy as np
import argparse
import os
def test_pattern(size=320):
"""A synthetic image with the features each mode is meant to show.
Hard edges for Canny, a smooth gradient for the blur, isolated specks for
the morphological close, and saturated colour for the HSV conversion. A
photograph would work too; this one is here so the file runs with no
arguments and no downloaded asset.
"""
img = np.zeros((size, size, 3), dtype=np.uint8)
img[:, :, 0] = np.linspace(0, 255, size, dtype=np.uint8) # gradient
cv2.rectangle(img, (40, 40), (150, 150), (0, 220, 255), -1) # hard edges
cv2.circle(img, (230, 230), 55, (255, 60, 60), -1)
cv2.line(img, (0, size - 1), (size - 1, 0), (255, 255, 255), 2)
rng = np.random.default_rng(20260809) # specks
for y, x in rng.integers(0, size, (120, 2)):
img[y, x] = (255, 255, 255)
return img
def process_image(image_path, mode, out_path=None):
if image_path:
img = cv2.imread(image_path)
if img is None:
print(f"Error: Could not load image {image_path}")
return
print(f"loaded {image_path}: {img.shape[1]}x{img.shape[0]}")
else:
img = test_pattern()
print(f"no --image given, using a generated "
f"{img.shape[1]}x{img.shape[0]} test pattern")
if mode == 'gray':
result = cv2.cvtColor(img, cv2.COLOR_BGR2GRAY)
elif mode == 'edges':
gray = cv2.cvtColor(img, cv2.COLOR_BGR2GRAY)
result = cv2.Canny(gray, 100, 200)
elif mode == 'blur':
result = cv2.GaussianBlur(img, (5,5), 0)
elif mode == 'morph':
gray = cv2.cvtColor(img, cv2.COLOR_BGR2GRAY)
result = cv2.morphologyEx(gray, cv2.MORPH_CLOSE, np.ones((5,5), np.uint8))
elif mode == 'hsv':
result = cv2.cvtColor(img, cv2.COLOR_BGR2HSV)
else:
print(f"Unknown mode: {mode}")
return
print(f"mode {mode}: output is {result.shape} "
f"{'grayscale' if result.ndim == 2 else 'colour'}, "
f"range {result.min()} to {result.max()}")
show_or_save(f'{mode.capitalize()} Image', result)
wait_or_skip(0)
cv2.destroyAllWindows() if "--show" in __import__("sys").argv else None
if out_path:
if len(result.shape) == 2:
cv2.imwrite(out_path, result)
else:
cv2.imwrite(out_path, cv2.cvtColor(result, cv2.COLOR_BGR2RGB))
print(f"Saved processed image to {out_path}")
def main():
parser = argparse.ArgumentParser(description="Advanced Image Processing with OpenCV")
parser.add_argument('--image', type=str, help='Path to image file; a generated test pattern is used when omitted')
parser.add_argument('--mode', type=str, choices=['gray', 'edges', 'blur', 'morph', 'hsv'], default='edges', help='Processing mode')
parser.add_argument('--out', type=str, help='Output file path')
args = parser.parse_args()
process_image(args.image, args.mode, args.out)
def wait_or_skip(delay=0):
"""cv2.waitKey needs a window; without one it raises. Skip it instead."""
import sys
if "--show" in sys.argv:
return cv2.waitKey(delay)
return -1
def show_or_save(title, image, _counter=[0]):
"""Display the frame, or write it to a file when no window is available.
Headless OpenCV has no GUI at all, and even a full build cannot open a
window over SSH or inside a container. Falling back to a file keeps the
project runnable everywhere and leaves something to look at afterwards.
"""
import os
import re as _re
if "--show" in __import__("sys").argv:
cv2.imshow(title, image)
return None
_counter[0] += 1
stem = _re.sub(r"\W+", "_", title).strip("_").lower() or "frame"
name = f"{stem}.png" if _counter[0] == 1 else f"{stem}_{_counter[0]}.png"
cv2.imwrite(name, image)
print(f"saved {name} ({os.path.getsize(name):,} bytes)")
return name
if __name__ == "__main__":
main()Example Usage
python advanced_image_processing_with_opencv.py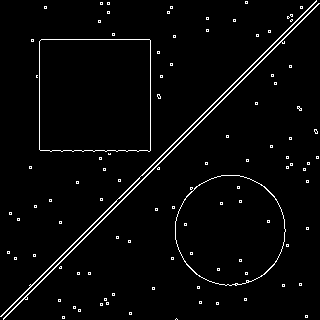
What it produces
Running the file exactly as it ships takes 0.7 s and prints:
no --image given, using a generated 320x320 test pattern
mode edges: output is (320, 320) grayscale, range 0 to 255
saved edges_image.png  (3,440 bytes)
How it fits together
Read from the top: this is what runs when you execute the file, and which function calls which. It is generated from the code, so it cannot drift from it.
  flowchart TD
  RUN(["python advanced_image_processing_with_opencv.py"])
  process_image("process_image")
  main("main")
  wait_or_skip("wait_or_skip")
  show_or_save("show_or_save")
  RUN --> main
  main --> process_image
  process_image --> show_or_save
  process_image --> wait_or_skip
Explanation
Key Features
- Filtering: Apply Gaussian, median, and bilateral filters.
- Edge Detection: Use Canny, Sobel, and Laplacian methods.
- Feature Extraction: Detect corners and keypoints.
- Image Transformations: Resize, rotate, and crop images.
- Error Handling: Validates inputs and manages exceptions.
- CLI Interface: Interactive command-line usage.
Code Breakdown
- What it imports (lines 6–9)
import cv2
import numpy as np
import argparse
import osprocess_image— the function (lines 11–39)
def process_image(image_path, mode, out_path=None):
    img = cv2.imread(image_path)
    if img is None:
        print(f"Error: Could not load image {image_path}")
        return
    if mode == 'gray':
        result = cv2.cvtColor(img, cv2.COLOR_BGR2GRAY)
    elif mode == 'edges':
        gray = cv2.cvtColor(img, cv2.COLOR_BGR2GRAY)
        result = cv2.Canny(gray, 100, 200)
    elif mode == 'blur':
        result = cv2.GaussianBlur(img, (5,5), 0)
    elif mode == 'morph':
        gray = cv2.cvtColor(img, cv2.COLOR_BGR2GRAY)
        result = cv2.morphologyEx(gray, cv2.MORPH_CLOSE, np.ones((5,5), np.uint8))
    elif mode == 'hsv':
        result = cv2.cvtColor(img, cv2.COLOR_BGR2HSV)
    else:
    # ... 5 more lines in the file ...
    if out_path:
        if len(result.shape) == 2:
            cv2.imwrite(out_path, result)
        else:
            cv2.imwrite(out_path, cv2.cvtColor(result, cv2.COLOR_BGR2RGB))
print(f"Saved processed image to {out_path}")main— the function (lines 41–47)
def main():
    parser = argparse.ArgumentParser(description="Advanced Image Processing with OpenCV")
    parser.add_argument('--image', type=str, required=True, help='Path to image file')
    parser.add_argument('--mode', type=str, choices=['gray', 'edges', 'blur', 'morph', 'hsv'], required=True, help='Processing mode')
    parser.add_argument('--out', type=str, help='Output file path')
    args = parser.parse_args()
    process_image(args.image, args.mode, args.out)
The file defines 2 top-level symbols in all; the whole thing is above under Write the Code.
Features
- Comprehensive Image Processing: Filtering, edge detection, feature extraction
- Modular Design: Separate functions for each task
- Error Handling: Manages invalid inputs and exceptions
- Production-Ready: Scalable and maintainable code
Next Steps
Enhance the project by:
- Adding more filters and edge detectors
- Supporting batch processing of images
- Creating a GUI with Tkinter or a web app with Flask
- Integrating with machine learning models for classification
- Adding visualization of results
- Unit testing for reliability
Educational Value
This project teaches:
- Image Processing: Filtering, edge detection, feature extraction
- Software Design: Modular, maintainable code
- Error Handling: Writing robust Python code
Real-World Applications
- Medical Imaging
- Security Systems
- Photo Editing Tools
- Industrial Automation
Checkpoint exercise
This exercise practises sliding a Sobel kernel over a tiny image to find edges, the operation behind cv2.Sobel.
Tab indents. Press Escape, then Tab, to leave the editor. Control plus Enter runs the code; Control plus Shift plus Enter submits it.
Press Run to see what your code prints.Conclusion
Advanced Image Processing with OpenCV provides a robust framework for performing a variety of image processing tasks. With modular design and extensibility, this project can be adapted for real-world computer vision applications. For more advanced projects, visit Python Central Hub.